Unit 2 & 4 – Task 3 -Truth or Dare (Unit 2 AC 2.1, 2.2, 2.3, 2.4 and Unit 4 AC 1.1, 2.1, 2.2, 2.3, 3.1)

In this final task I decided to continue on the theme that I had used in the ‘UPDOWNALLAROUND’ project as this gave me further ideas to explore. I decided to continue working with slightly mundane household objects and utensils. I wanted to take them away from their day to day purpose and present them differently to how we would normally view them, and even wonder initially what they are. I endeavoured to make them more interesting and even dramatic than they actually are. I wanted to maximise the use of light and shadow, as well as wanting to make the colours stand out. I also continued working with the canvas background as I found it useful to detach the objects from their normal reality and purpose.

Below I go through each shot, its composure, the ideas behind it and its enhancement in post production through digital processing techniques. Each shot is presented pre- and post enhancement.:-

1.


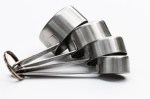
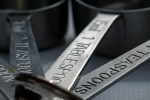
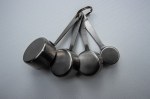
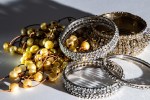
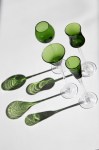
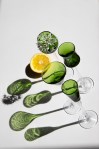
In this first shot I used the measuring spoons one more time. I placed them face down on the canvas fanned out. It was taken with 16mm setting on 10-22mm wide angled lens, aperture at f6.3 and 1/500 speed. This was taken in sunlight with slight cloud cover. This achieved a  great effect with the shadows I feel together with the shiny surface of the metal. Using the canvas again helped take the spoons out of their environment  and into a space of their own . I particularly like the contrast of smooth metal with the texture of the canvas, both of which are kept in focus. The light is defused and coming slightly from above and to the left of the spoons. This gives very slight shadow to the right and below the spoons and their handles. Hopefully one takes a moment realise what one is looking at, separated from their normal environment. I then wanted to brighten the shot and make the spoons stand out more.

The shot was then enhanced via Adobe Bridge and Camera Raw. In the Basic level of Camera Raw I increased Exposure very slightly to +0.7 and the contrast to +36. This very quickly brightened the photo and helped the spoons stand out more. Continuing this theme I increased the white slider slightly for brightness and reduced the highlights and blacks marginally. And finally on Basic I increased vibrance to  +37. Moving onto Detail and sharpening I set radius at 1.2 and detail at 30, and then used amount at 66. Finally in split-toning I set shadows hue at 194 and saturation at 18. This all hopefully added detail, contrast and little cold blue to the image.


2.


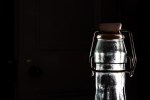
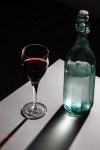
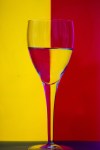
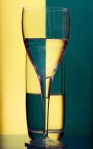
This is the first of 3 shots of a green liquor glass. I haven’t added a shot of the glass upright but the idea here was to look at the glass in a different way to normal and hopefully make an interesting shot emphasising light, vibrant colour, contrast and shadow. The glass is positioned obliquely both to the sunlight and the viewer allowing a complete view of the glass and its shadow. The shot was again taken using natural sunlight on a bright sunny day.  This generated a very clear shadow and the nature of the glass gives an almost textured shadow. Once again the canvas helps maximise contrast. This was shot using 100mm lens, f11 and 1/500 speed. This hopefully kept the green bowl in focus whilst allowing the stem at base to fade/blur a little. This is clearly a glass on its side, but hopefully causes the viewer to pause a little in establishing that and the white background adds to its detachment.

In Camera Raw I once again increased exposure a little to +0.40, contrast to +42 and whites to +31 , as well as highlights to +18. This was to brighten the shot further and create the very white background. I then moved vibrance to +30 to bring the colour out more. In detail/sharpening I set radius at 1.3 and detail at 24 with amount at 48. This further enhanced the clarity of the glass and its shadow. Finally in split-toning in shadows, I  set hue at 122 and saturation at 25. This further enhanced the green of the glass and its shadow without becoming too surreal.


3.


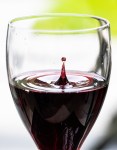
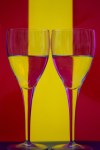
In this shot it is obviously the same subject shot in the same circumstances. This time the glass is positioned where we look into the top of glass lying on its side. The sun is behind the glass and so the shadow comes towards us. The f11 aperture allows to see all of the green bowl of the glass clearly but the stem and base blur a little into the background. Also we are now visually a little further away from it being just a glass any more. The textured shadow remains and varies when we look at some it through the glass.

In post production in Camera Raw I wanted to make the white as white as possible and colour as vibrant as possible. With the sun behind the subject there was less adjustment required but contrast was moved up to +47 and blacks to -35 to brighten the white and deepen the colour and shadow. In detail and sharpening I set radius at 1.4 and detail at 61 with amount at 71. I found this really accentuated the brilliant clarity of the green glass and the small starry sunlight in the depths of the bowl. In split toning I was agin adjusted the hue in shadow to 119 and saturation to 36. This made the green even more vibrant.
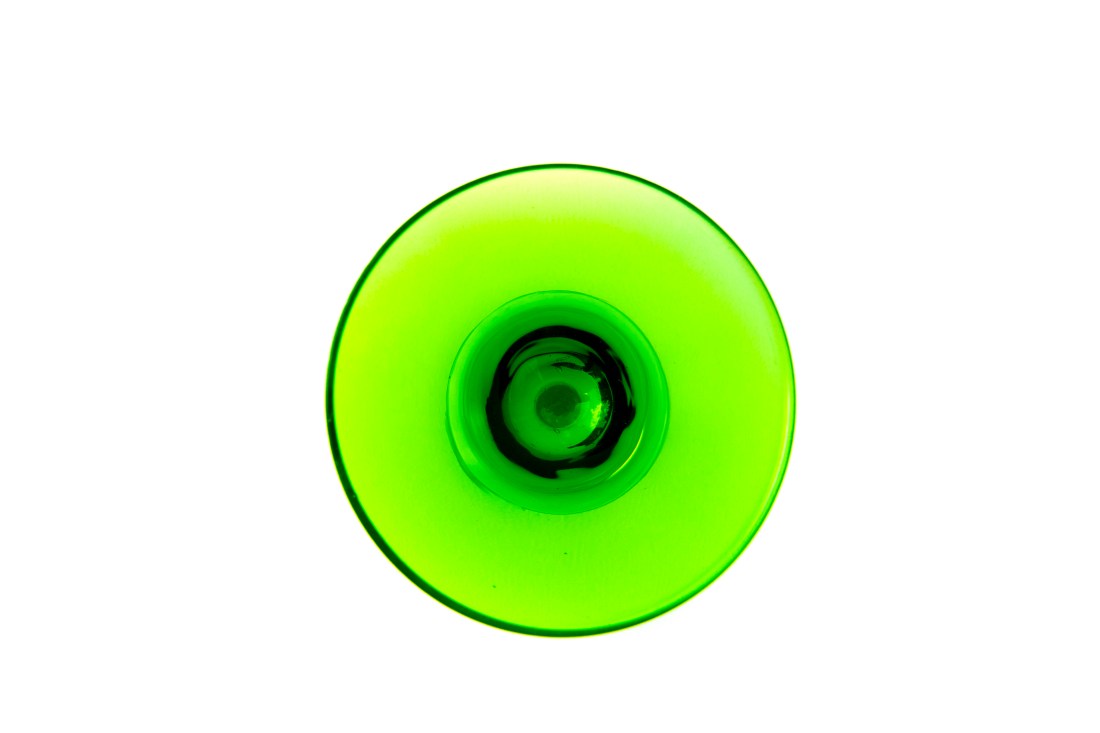
 

4.


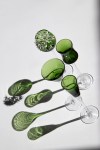
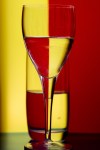
In this final shot of the glass we can no longer even recognise it as a glass. It is taken directly from above the glass and you can only guess what it is. Unfortunately, whilst taking the shot from above improved the soft shadow in the spoons shot above, it added shade in this one and made the pure white background more difficult to achieve. This was taken again with f11 aperture so that all of the visible glass is in focus but at 15mm on a 10-22mm lens. This was designed to get as close as possible to the bowl of the glass and maximise its image.

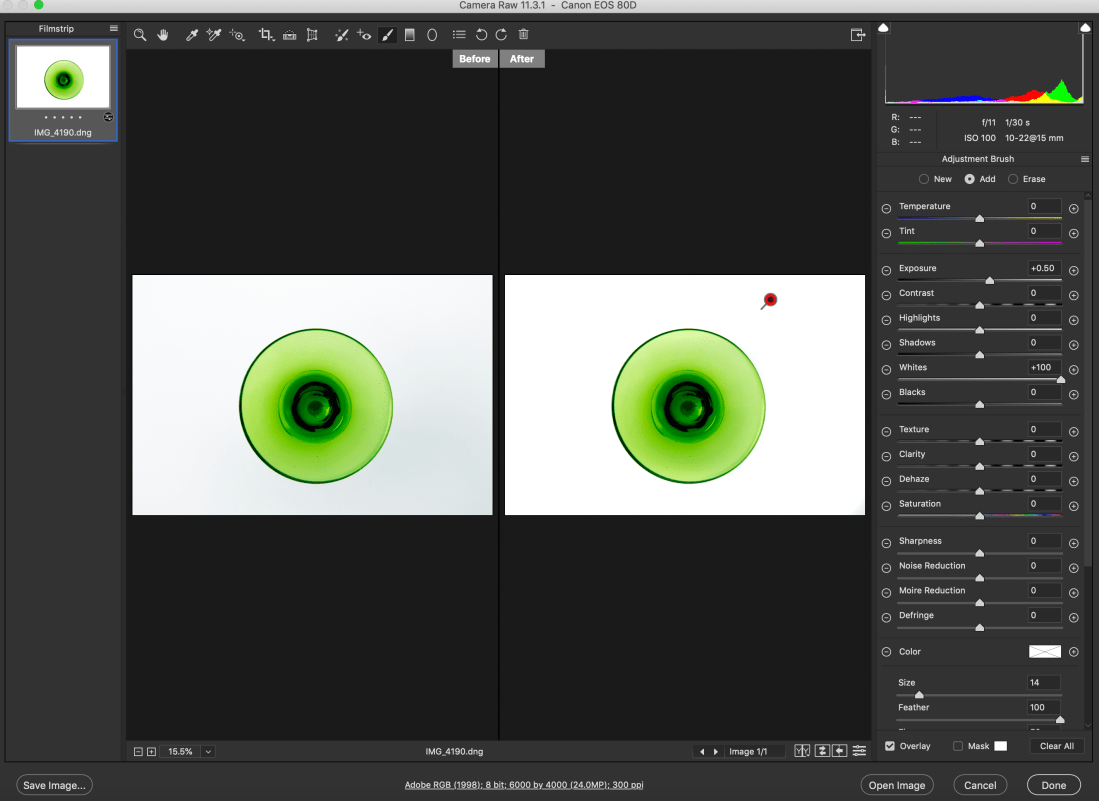
The joys of working with sunlight meant the white in this shot is not as strong as the previous two and the background became a little grey in areas. In Camera Raw basic contrast was increased to +46, whites to +38, and blacks moved to -32, in order to brighten the background and obviously increase contrast. Vibrance was increased to +29 to once again bring out the green. In split toning shadow’s hue was brought to 132 with saturation of 47 to bring the colour out further. Finally in effects I added vignetting amount to +30 with midpoint and roundness set at zero and feathering at 65. This helped take some of the darkness away from the corners of the shot. I have since found that the white background can be improved further in Camera Raw with the ‘Adjustment Brush’ tab, as can be seen below (sadly after sending them to print), and then adding a new brush I could bring more vibrance to the green:-

IMG_4190_1_1


Screenshot 2019-07-02 at 15.15.44.png

5.


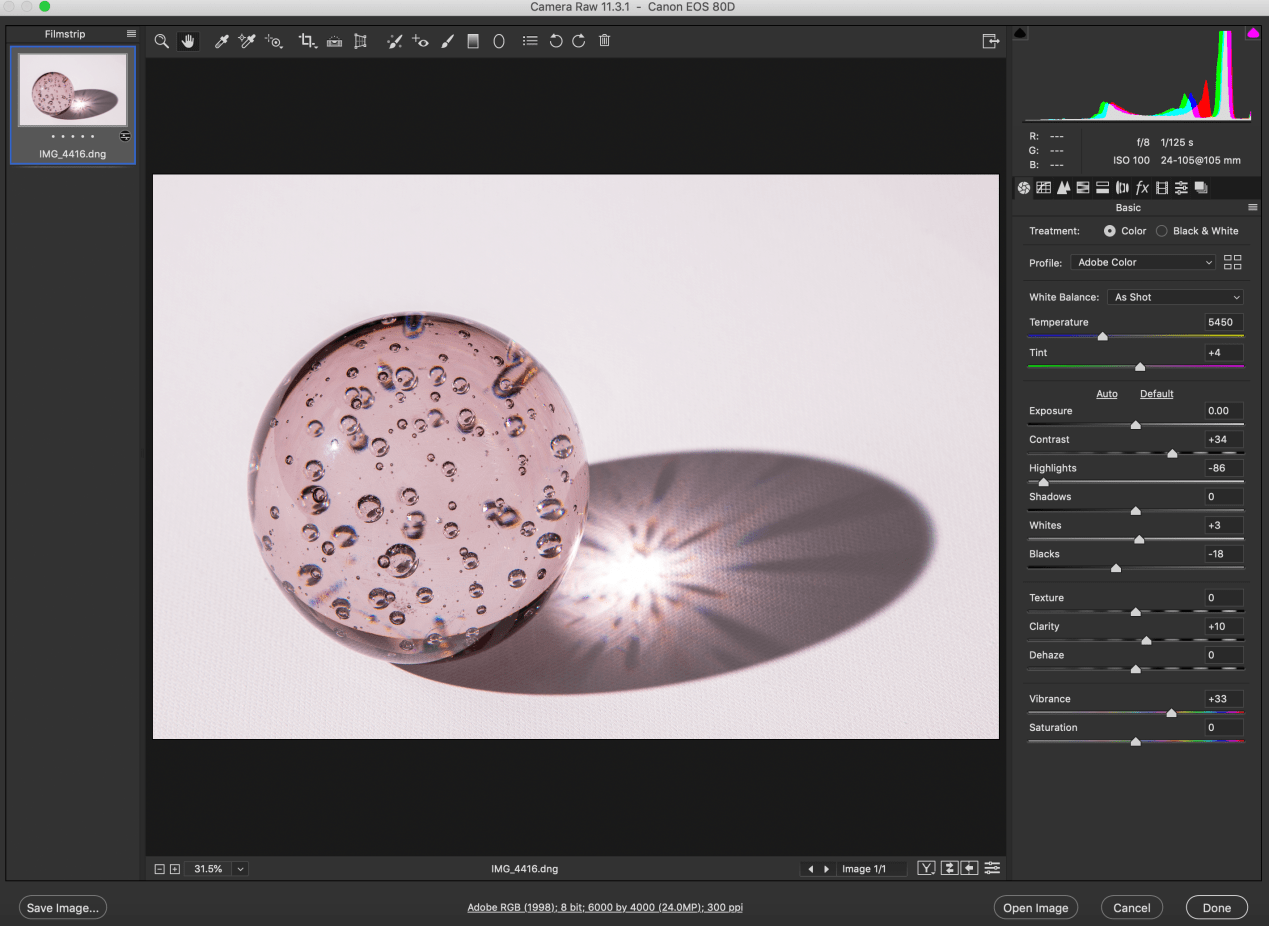
In this shot I stayed with glass as I enjoyed its clarity, transparency and shadow. In this case I used a large paperweight style ball of glass, slightly pink/magenta in colour. The glass ball has bubbles set in it which adds to its interest. This time I used a flash set on a tripod with a Hahnel transmitter and receiver remote trigger set. This allowed me to experiment with lots of angles. I finally settled on this one with the flash to the left and slightly forward of the ball. This generated this large shadow and the flash creates a starburst effect in the centre of the shadow. The bubbles in the glass generate new colours. Once again the objective was to create a slightly surreal image not immediately knowing what you are looking at, with a lot happening within the glass ball as well as in its shadow.

In post production I wanted to try to bring out the colour more and add definition to the glass and bubbles. Contrast was increased once agin to +34. I moved highlights quite dramatically to -86 and blacks to -18. This really brought out the definition of the glass ball and the shadow together with vibrance brought up to +33. In detail/sharpening I set radius at 1.3 and detail at 25 with amount at 110, again bringing out definition. And finally in split toning I set highlight hue at 315 with saturation at 8 and shadows’ hue at 317 and saturation 5. Although I wanted to bring out the colours, I could only use very little saturation here before everything became to pink, including the white canvas, so I settled for just a little.

Screenshot 2019-06-29 at 13.34.45.png


Final 5


Printing and presentation

When printing these photographs, I chose Giclee Canson Baryta prints over C-tpye prints.  This is because C-type is best used for middling colours , whilst Giclee performs best with bright bold and contrasting colours. I also chose a Baryta paper as this was most likely to give me the brightest cleanest whites which is what I needed given the background that I had used. as well as the blackest blacks. C-type prints use photographic print paper exposed to laser or LED light. Giclee uses inkjet print technologist together with pigment based archival inks. Whilst editing the shots in Camera Raw I saved the images as .dng files (digital negatives) retaining all the information of the raw file and settings. These were then saved as .tif files to send to the Printspace and as .jpg to upload onto the blog. Tiff files retain the most data for printing and preferred by the print companies, whilst jpeg files are used for the blog as they are compressed and can be compressed further, thus minimising use of memory space. I saved the files in Adobe RGB as this maximises the colour spectrum for printing whilst sRGB was primarily designed for colour images viewed on monitors.


Safe working Practices

As always with photographic projects maintaining good health and safety protocol is paramount. Simple rules must always be followed.

Oneself – always maintain and check for personal safety. Most of these shots were taken at home away from traffic, other people and hazards. Nevertheless whilst taking photos above, below etc be aware of slip, trip hazards and make your surrounding space safe.

Equipment– Camera equipment is generally expensive and often delicate and hard-edged. Protect lens with UV filter and lens caps and also return to protective covering. Sensors can get dirty and need to be cleaned professionally on occasion.

Other people and property – In this project these were not a factor, but should always be born in mind. Ask permission to photograph people in order to avoid offending them. Private property is off limits without permission to photograph. This often includes railway stations, office complexes etc.

Tripods – tripods are angular and awkward. Always be aware when using them of tripping and falling as well as hindering others.

Trip hazards – these can be numerous depending on your environment. Wires, cables, tripods again, all can cause accidents and injury. Always work in a safe space.

Computers – a lot of photography work is now done on the computer in post-production enhancement work. Working with computers has its own set of hazards.                               -minimise glare, protect your eyes, reduce brightness                                                                  -minimise clutter- keep food and drink away                                                                                         -look away from the screen regularly, at least even 30mins                                                                 -take a break every hour                                                                                                                      -always make sure there is adequate ventilation around you and the computer                   -position screen correctly- normally 20-30 degrees from vertical.                                                -posture – there are many office injuries caused by bad posture. Your keyboards should be at elbow height, your feet flat on the floor and thighs parallel to the floor. Most office chairs and desk can be adjusted nowadays to satisfy this and avoid back, neck and wrist strains.


Unit 2 – Task 2 – UPDOWNALLAROUND (AC 1.1, 2.1 2.2, 2.4, 3.1)

UPDOWNALLAROUND

My research into the three artists (William Eggleston, Ernst Haas, Alex Prager) together with my visit to the Martin Parr exhibition (Only Human) influenced me greatly. I enjoy all of their uses of vibrant colour and drama applied to everyday subjects. I then set about finding very ordinary objects around the house with which to experiment. I photographed a remote control, some measuring spoons and a fluffy gnome. I placed the first 2 on an unused canvas and photographed them all from as many angles as I could as well as close up and a little further away. Below are a selection of the results.

1.


2.


3.


I quickly found that I was unable to create the more interesting shots I was looking from either the remote or the gnome, but wanted to take the measuring spoons further. I photographed them on the canvas both inside using a flash and outside using natural sunlight. In spite of its changing nature I found the results from the natural sunlight more satisfying as it gave softer shadows thanks to the diffusion from the light cloud cover of that day. The same effect could possibly have been achieved indoors with diffusers and soft boxes. I also found that the best shots were achieved when the spoons were fanned out and not stacked or angled.

In spite of their very mundane nature and use I found that some of the shots were interesting and even dramatic! This was my intention and together with some work in Lightroom arrived at what I thought the two best results below.


I’m pleased with both of these shots. Together they display very contrasting images of the same object. In the first the spoons are fanned out upside down on the canvas and the shot was taken at an angle to them with the soft shadow coming towards the viewer. I used a wide-angles lens at f4 and so limiting depth of field. The ring and the first spoon are in clear focus whilst the fourth larger spoon is not in clear focus. Visually I like this effect as it adds to the infinity of the canvas background. I also think the pronounced texture of the canvas adds to shot in contrast to the smooth metallic spoons. Again the texture of the canvas fades away into the background of the shot. In the second shot taken with a 100m macro lens and aperture of f2.8 I managed to get up close with a narrow depth of field. Both the ring and the pans are little blurred and only some of the writing is in focus. The ring and therefore the fan is slightly to the left of shot. This gives a completely different image of the spoons and hopefully even a little drama to the shot.

The Dud

IMG_4216

This photo I found the least effective. Firstly in terms of set up the spoons are angled resting on top of each other. This didn’t work well visually made worse by the fact they are obviously different sizes. This latter factor works well I think when they are fanned out and not overlapping. Secondly taking the shot with the pans in the foreground does not work. The best shots were definitely from above or with the ring in the foreground, then moving along the handles to the pans in the background. In this shot the pans and their handles appear compressed into eachother.


Safe working Practices (3.1)

As always with photographic projects maintaining good health and safety protocol is paramount. Simple rules must always be followed.

Oneself – always maintain and check for personal safety. Most of these shots were taken at home away from traffic, other people and hazards. Nevertheless whilst taking photos above, below etc be aware of slip, trip hazards and make your surrounding space safe.

Equipment– Camera equipment is generally expensive and often delicate and hard-edged. Protect lens with UV filter and lens caps and also return to protective covering. Sensors can get dirty and need to be cleaned professionally on occasion.

Other people and property – In this project these were not a factor, but should always be born in mind. Ask permission to photograph people in order to avoid offending them. Private property is off limits without permission to photograph. This often includes railway stations, office complexes etc.

Tripods – tripods are angular and awkward. Always be aware when using them of tripping and falling as well as hindering others.

Trip hazards – these can be numerous depending on your environment. Wires, cables, tripods again, all can cause accidents and injury. Always work in a safe space.


Unit 2 – Task 1 – AC 1.2 – Research 3 Photographers

The 3 Photographers I chose to research are William Eggleston, Ernst Haas and Alex Prager. All three utilise colour, drama and angles to great effect.

William Eggleston

Image result for william eggleston

William Eggleston was born on 27 July 1939 in Memphis, Tennessee. Born and raised in the South, he developed a love of visual media. In spite of going to 3 universities he never graduated, but whilst at Vanderbilt University a friend gave Eggleston a Leica camera and photography soon became his vocation. He went on later in life to lecture at Harvard in the 1970’s. Like all photographers in the 1960’s he started mainly in black and white but he has quick to take to colour photography which was initially regarded as commercial and less artistic, but it is in colour that he made his name. His work is often characterized by its ordinary subject-matter, often combined with his powerful use of vibrant colour. This picture below is one of his early photographs catching the evening sunlight on a teenager gathering trolleys at a supermarket. This very much describes his style of documenting arguably inconsequential moments mainly in the American South in a manner that makes the colours stand out.

Image result for william eggleston photosImage result for william eggleston photos

I also enjoy his use of angles

Image result for william eggleston photosImage result for william eggleston photosRelated imageRelated image


Ernst Haas

Ernst Haas (1921–1986) was born in Vienna and took up photography after the war. Initially he was a documentary photographer of post-war torn Europe which brought him to the attention of Life magazine, although keen to remain independent he refused a staff job with them.  He moved to the USA in 1952, where he was an early adopter of Kodachrome colour film and soon become renowned for his colour photography and went on to continue to do work for Life magazine, as well as Vogue, Look and many others.

A few of his photographs below show his breadth of work with landscapes, cityscapes and close-ups. They also display his powerful, almost exaggerated use of colour and drama in his photography. He clearly found humour in the binoculars, added drama to the New York skyline with reflections, and took a wonderfully dramatic landscape shot in Monument valley, as well as bringing out the powerful colours of nature. The last shot taken in Alberquerque brilliantly mixes brightly lit strong colours with dark stormy sky and reflections on the water.

•Binoculars, NY 1952•Clouds & Skyline, NY 1957

•Red Rose 1970•Monument Valley, Utah 1962

•Red Tulips, Japan 1980

•Route 66, Albuquerque, New Mexico 1969


Haas also experimented expertly with motion and blur, creating more truly unique photos as can be seen below.

•La Suerte de Capa, Pamplona, Spain 1956

•Regata, California 1957

•Traffic, New York 1963

Motion Horses


Alex PragerRelated image

Alex Prager was born on 1 sept 1079. She was born and works mainly out of Los Angeles, California. She again is a powerful user of colour and its vibrance. She is both a photographer and a film-maker. She often uses actors to take very staged but also  dramatic photographs, and once again angles are everything!

Image result for alex pragerRelated image

Related imageRelated image


Unit 3 – Task 3 – Still life AC(1.1, 2.1, 3.1, 3.2)


Task 3 – Still Life AC(1.1, 2.1, 3.1, 3.2)

I wanted to experiment with shadow and reflection in the still life. Initially I simply used the shadow cast by a pair of spectacles with flash set up obliquely behind them and tried to create some drama with the much larger shadow. This required trying shots from all around the spectacles, and keeping the flash fairly low relative to the glasses. I also needed to reduce the power of the flash as initially it created a rather washed out effect.  I then moved to  jewellery, trying flash from one side and a strong torch from the other, allowing both sides of the shot to be lit whilst having shadow behind, with the right side clearly more powerfully lit by the flash than the left with the torch.  I also experimented with a glass of wine and chilled bottle of water to see what sort of effects could be achieved with the dew on the bottle and the long shadows. All of these shots were taken in manual with shutter speed set at 1/125 and using a flash with various power settings. Mostly I found the flash needed to be powered down.

I also tried one shot of a drop of wine into the glass of wine. This required a very high ISO to achieve the necessary fast shutter speed. I finally settled on wine glasses and liquor glasses. The green coloured glasses were particularly effective at casting a long and interesting shadow. I experimented here with both flash and sunlight. The green glasses on the board created the best effect with the strong sunlight through the kitchen window. Here again I experimented with both flash and natural sunlight. The sunlight achieved the best results on this particular occasion thanks to being a particularly bright day. The white board is virtually ‘bleached’ to highlight the texture of the green glasses and the interesting shadow they cast.


Finally I experimented with the reflection of light and colour through glasses partially filled with water, creating the mirroring effect of the colours. This was set up with coloured plastic letter files held up by bulldog clips attached to lever arch files to the side.  Again I found the images with coloured backgrounds were difficult with a flash as it was difficult to achieve without some of the flash itself in the shot as the light needed to be coming through the coloured plastic folders. Once again the broader stronger but defused sunlight from outside was the most effective on this occasion.  I also sometimes had to increase the ISO given the light conditions trying to use sunlight indoors. The base was also darker coloured plastic which reflected shadow upwards slightly darkening the side of the glasses given an improved effect. Overall, whilst pleased with the results I think they could be improved in a studio with a white background behind being bright lit, replicating the sunshine.

IMG_0755


Metering (AC2.1)

Clearly getting the best exposure is heavily dependent on getting the most appropriate level of lighting.

Highlight alert – it is best to have this enabled, thereby on the ‘info’ setting you can see what parts of your photo are overexposed as that are will blink white/black in the playback mode. You need to then adjust settings to avoid this overexposure, or you may be happy with that ‘whiteout’, depending on your shot.

Spot metering – Most cameras have a metering choice – Evaluative, partial, spot and centre-weighted. Whilst the others take in the whole frame to evaluate light and therefore exposure the spot setting only uses the area within the small central circle in the viewfinder to take a meter reading of the light. This then emphasises that part of the shot and so is particularly useful for portrait photography and specific subjects such as a flower, whereby you are deliberately creating contrast. Clearly you can move the spot circle over your subject matter and note the settings to get best results.

Flash meter – Using a separate flash meter is an arguably more precise method of measuring light. The amount of light falling on the subject can me measured accurately by placing the the white dome (lumisphere) just in front of the part of the subject to be focused on with the dome facing the light source. When the flash is then triggered an accurate light reading will be taken and so the ideal aperture setting found if shutter speed and ISO have been set. If the suggested aperture is different to your ideal setting then the power of the flash needs to be either increased or reduced accordingly until you achieve your desired aperture setting.


Unit 3 – Task 1 (AC4.1) and Task 3 – Portrait (AC 1.1, 2.1, 3.1, 3.2)

Task 1 – AC4.1

Clearly when setting up for a shot using studio lighting there is significant preparation, and one should always maintain good and thorough safe practise. The relevant space needs to be cleared, stool put in place and the flashes lowered into position. Once a flash is on, it is important to remember how hot they can become and how bulky and hard-edged they are. It is also important to keep the subject safe from both the bright flash and the heavy and sometimes hot equipment around them, as well as yourself.

  • make a plan before shoot starts
  • make sure all equipment is correctly plugged in
  • keep cables to a minimum and tape them down to avoid tripping
  • do not touch lamps/flashes once on – heat resistant gloves best solution
  • keep area in use as people free as possible – photographer and subject only if poss
  • always be aware of lowered flashes and raise them above head whenever possible


Task 3 – (AC 1.1, 2.1, 3.1, 3.2)

We had a dedicated studio session for this project. I wanted to use a lot of shadow and aimed for the more ‘dramatic’ shot with a dark background and hard lighting. I tried a number of angles and views, but found the side on shots most effective. Initially I set up two flashes with snoots angled from behind the subject, in order to create principally a silhouette style shot whilst also hopefully keeping the subject recognisable as well as getting catch lights in the eyes or eye where possible. This was effectively ‘clam’ lighting’ set up behind the subject. In the third shot the left hand back light was turned off and I experimented with a silver reflector and then a fill light set at a weaker strength as I wanted the main source of light to be mainly on the unseen side of the face. This was the most effective I felt as the main light is clearly on the other side of the face, but the weaker fill light allowed us to see the definition of viewed side of the face. I also experimented with the subject looking at the camera and obliquely away.  The camera was set on manual using 1/125, f8.0 and ISO 100. I started with the flash power on 1, then 2 and finally 3, and assessed the results. Given most light was coming from behind the subject, the more powerful setting achieved the best results. In post shot editing I also experimented with black and white for further effect.


Unit 1 – My Camera and approaches to Photography (AC1.1, AC2.1, AC2.2, AC4.1 )

It is important to note that my camera is a Canon EOS 80D which has a APS-C sensor. The ‘crop factor’ of my camera is 1.6x. All lenses are described by their focal length (24mm, 50mm, 100mm etc) in relation to a full frame sensor. Hence using a 50mm on my camera will have the effect of a 80mm on a full frame sensor. This effect is described visually below.

Image result for crop factor

I enjoy most forms of photography, but generally prefer to keep a distance from my subject matter and so often move more towards landscape and wildlife photography. I also like to try to work with movement and emphasise light and its effects.

I shoot mostly with the camera set to aperture priority (Av). I find this the best way to achieve my desired outcomes as depth of field is normally my first priority. Similarly I start with the camera set at ISO100, thus getting highest quality. Clearly on occasion both of these have to be compromised to achieve faster shutter speeds, but I will still mostly do this by widening the aperture on Av, and then increasing ISO if need be.

Photographic influences

I recently went to the Martin Parr ‘Only Human’ exhibition which I thoroughly enjoyed. His work is wonderfully full of mischief, humour and colour. I also liked his often slight blurring to emphasise movement. Most of his work is up close, but I also enjoyed some of his more distant shots:-

.Image result for martin parr Source: radiotimes.comImage result for martin parr Source : blackwells.co.uk


I found Trish Murtha and her poignant documentary photos very powerful indeed. She had a very important social message to convey. I think her use of black and white in her photography helped emphasise her message.

Image result for trish murthaSource: twitter.com

Image result for trish murthaSource: amazon.co.uk

In direct contrast, fashion and style photographer Mark Sanders clearly achieves some very slick, silky smooth shots which work well in their genre. I like this shot below with the blurring of clouds accentuating the shot of the Shard.

Image result for mark sanders photography Source: standard.co.uk

I like Rut Blees Luxemburg’s urban photography very much. She specialises in longer exposure mainly nighttime photography, which I would like to explore further. Here she skilfully manages to emphasise the pedestrian’s movement with a little blurring whilst getting the lorry’s headlight and streetlights still and max light-rays.

Image result for rut blees Source: museum crunch.org

Finally, I also toyed with ICM (Intentional Camera Movement). This involves handheld shots with slowish shutter speeds, and deliberately moving the camera to create various effects as seen below.

Image result for intentional camera movement Source: pxleyes.comImage result for intentional camera movement Source: digital-photography-school.comImage result for intentional camera movement Source: reddit.com


Health and Safety (AC4.1)

Most camera equipment seems to be heavy, sharp edged, often bulky and sensitive, and so needs to be looked after well, both for its own safety and that of others. This is particularly the case when you add a tripod to the mix. In addition to this most camera equipment is quite delicate and must be looked after well. I have often been out photographing on roads, pathways, bridges, in glasshouses, as well as by rivers and lakes etc., all of which potentially create hazards. There have often been people about or even in shot, as well as wildlife. It is important to be considerate of all these factors. One should always endeavour to seek permission from people in shot, be wary and keep a safe distance from wildlife. When shooting it is important to be very aware of your surroundings, not blocking pathways or getting in the way of others. When using a tripod this only adds to the required considerations of others and surroundings, as you potentially become a larger even less mobile obstruction. One is allowed to photograph in most public spaces, but will invariably need permission in private spaces. This includes stations, galleries and obviously office buildings. You should also be careful not to infringe on any copyrights and accredit others’ work. I keep my camera, lenses and filters securely in a dedicated, padded backpack.


Unit 3 – Lighting and Studio Lighting (AC 3.1,AC 3.2, AC 4.1)

We set camera to manual with shutter speed at 1/125, F/8.0, ISO 100

1/125 is best speed to sync with flash. It is important to remember that the shutter speed also regulates how much ambient light enters the shot. This sets how much background you expose.

The intensity of the flash sets how bright the subject is. The shutter speed sets level of background exposure with 1/125 minimising background.

Here we experimented with flash positioning.

  1. Butterfly lighting – here the flash was set directly in line with the subject and a little above. This should light the face equally with small (butterfly) shadow below the nose and chin.
  2. Loop lighting – the flash is set at approximately 30 degree angle to the subject and a little above again. This lights the subject obviously slightly more on one side and generated a small ‘loop’ shadow of the nose.
  3. Rembrandt lighting – the flash was moved further round at approximately 45 degrees to the subject whereby more of the right side is shaded, generating a more dramatic portrait.
  4. Short lighting – the flash remained in the 45 degree angle position, but the subject moved towards it. this meant a smaller amount of the face was lit and a greater proportion in shadow.
  5. Long lighting – here the subject faced away from the flash allowing a greater portion of the face to be lit.
  6. Split lighting – this is where the flash is set at 90 degrees to the subject, hence only lighting one side, leaving the other side of the face in almost complete darkness.

It is also worth noting that this shot was taken with a white background which does not show up at all due to the angle of light. We also used a snoot on the flash focusing the light purely on the subject. This also has the effect of ‘hard’ lighting.


In order to soften the light, we need to diffuse it. We can do this using a ‘soft box’. In the following photos we used a soft box which spreads the light more widely, allowing more ambient light in the shot.

In all of the photos above we had a white background. We also used reflectors selectively to balance light and shade more subtely.

  1. The flash was positioned for split light and with a Snoot. Hence focused, hard light with the background black.
  2. Same as above, but with a gold reflector held on the right hand side of the face. I think here the reflector was a little too far away, but one can see some of the right hand side of the face slightly lit, as opposed to the heavy contrast of only split lighting.
  3. Now the Snoot was exchanged for a Softbox still positioned for Split lighting. One can immediately see the more diffused light is now partially reaching the white background giving a grey colour. Also the lighting of the face is softer.
  4. We now added a silver reflector to the above setup, and the contrasts are much less severe, lighting both sides of the face , whilst painting the Split lighting effect.
  5. Here we returned to Butterfly positioning of the flash with a Softbox. The head was dipped a little, hence shadows below the nose and chin and accentuation of lines.
  6. With the head raised the lines disappear/reduce significantly.

4.1 Safety

It is important to note that Studio photography has even greater safety risks. There is scaffolding suspended from the ceiling, with multiple pantographs attached and multiple flashes attached to them. A Pantograph allows you to lift or lower the flashes which are larger and heavier than handheld flashes. One should always remember that these flashes get very hot very quickly. They should be handled with gloves. Flashes should always be raised above head height, when not in use. It should also be noted that people are in a confined space in a studio and so extra care taken. Finally, and not least , always remember the model and their eyes. Flashes are obviously very bright, and even the modelling light will make them very warm, uncomfortably so after a while.


Unit 1 – Task 3 – Postcode project (AC1.1, AC2.1, AC2.2, AC3.1, AC3.2)


Richmond and Kew give extraordinary variety for photography. There is considerable parkland where I want to explore both landscape and wildlife photography, together with towns where I want to experiment with urban photography.  I have decided to split the postcode into four areas to start this project, Richmond Park , Richmond Town, The River, Kew.

Richmond Park


These are pretty standard shots hopefully showing the essence of Richmond Park. I have used a range of focal lengths and shutter speeds.

  1. The quintessential Richmond deer. Here I added a x1.4 converter to a 70-200mm lens, thus achieving a 280mm focal length. Due to the converter f5.6 was the widest aperture achievable to blur the background.
  2. Feeding the birds. Here I was shooting into the sunlight, hence the fast shutter speed. Using f4.0 was necessary to get a fast shutter speed to capture the birds in flight but still allowed long depth of field due to distance from subject and 70mm focal length.
  3. Swan on Pen Ponds. Keeping my distance using 169mm focal length, but also using f4.0 aperture hopefully achieved a subtle blurring of foreground and background.
  4. Rural Richmond. You can really feel that you are far away in the countryside in the Park, in spite of being on the edge of a great city. Again using only 28mm focal length allowed broad depth of field in-spite of wide f5.6 aperture, which was needed to achieve shutter speed of 1/80 as the shot was handheld.


In these shots I was trying to contrast the proximity of the park to the big city with a blend of the metropolis and the wildlife/activity in the park.

  1. Deer quietly grazing whilst the Natwest tower looms in the background. I used f4.0 aperture and 200m focal length to hopefully maximise contrast and blur background.
  2. Here I used f14 aperture to get broad depth of field and so both foreground and background in focus. This slowed the shutter speed down to 1/30 , slightly blurring the runner, hopefully getting sense of motion. The 105mm failed to get the level of relationship with the background that I wanted.
  3. In this shot I kept the f14 aperture for broader depth of field but used 176mm focal length making the background appear larger in relation to the cyclists.
  4. Here I used f4.0 aperture and 189mm focal length so that the cyclist is the point of focus whilst the foreground and background are a little blurred, and the Shard looms larger.
  5. Same settings as 4.0 but emphasised with more cyclists.
  6. In this shot settings are similar to above but point of focus was further into the distance hence bringing the Shard more into focus and the cyclist slight blurred. We are also looking towards the Shard in the distance ‘with’ the cyclist.


Richmond Town

In these shots I tried to use the sunlight as well where I could. The weather was not always obliging but in shot 2 and 3 I tried to get the reflection of the sun glinting on the windows. Elsewhere I explored the the streets and alleys of Richmond. An attempt at some urban photography, which needs a lot more practice, possibly at a different time of day and with more movement.

The River

Kew

1. Here I aimed at blurring the motion of the cars and people in front of the entrance at Kew.  This used a 1/5 sec shutter speed and so required a tripod set on the pavement on the other side of the road, therefore requiring extra caution with both pedestrians and traffic (LO4).

2. Similar to above in trying to capture the motion of the bus more emphatically and the more limited motion of the waiting passenger. This required a tripod again and in spite of f/22 aperture further help was needed from a variable neutral density filter that darkened the shot a little further, and so lengthened the exposure to 1/2 sec, thus motion blurring the bus. Lots of caution required using a tripod by a road, on a pavement (AC4.1).

3. The longest of 1.6 sec, again needing the tripod and a f/22 aperture, and so creating the blurred/milky nature of the waterfall at Kew.

4. Spiral stairs at the ‘Temperate House’. This was a handheld wide angle shot. I had to raise ISO to 200 to get adequate shutter speed. A tripod would have been inappropriate at the top of stairs and on a narrow gangway (AC4.1). I particularly like this shot as although it is a spiral staircase, it also fells as if you are walking out into the forest, almost from a springboard.

5. Here again using a tripod I tried to combine a shot of flowers and minor movement of the people. I needed to ask permission and be wary of other pedestrians (AC4.1)

6. This again required a tripod at 1/6 shutter speed. Using 105mm focal length, f4 widest aperture and getting as close as possible I wanted to achieve narrowest depth of field with just ‘st’ of ‘Australasia’ in focus. Caution was taken not to block pathway of other visitors (AC4.1)

7. The Heron was standing on the edge of one of the ponds. I used maximum focal length and a wide aperture of f4 in order to try to get just the Heron in focus and a blurred background of the pond.

8. This is the gangway to the playground in Kew. Standing underneath with a wide angle lens I was trying to include the sweep of the walkway together with the sun shining through. By using a narrow aperture of f22 I was trying to get maximum depth of field which also helped maximise the sun-rays.

9. Here I tried to have the goose focused AND Syon House recognisable, but out of focus with modish aperture of f7.1.

10. This modern bridge over the lake offers a lovely curving sweep across. Here I used a wide aperture of f4.5 so that as the bridge sweeps away it also fades and blurs.

11. This time I used a narrow aperture and a variable density filter to slow the exposure right down which took the glare off the lake and emphasised the sun-rays.

12. Simply a beautiful sculpture at Kew. Here I used a narrow aperture and wide angle lens up close to exaggerate the presence of the ‘face’ which seems to both blend into the hedge as well as project out of it.

By the level crossing

  1. Taken using a tripod on the walkover. This involved quite a lot of experimentation with different apertures to get different shutter speeds. 1/10 seem to get the best combination of blur and ‘substance’ of the train whilst maintaining clear focus elsewhere. Care was taken to keep clear of the pedestrians on the walkway (Ac4.1)
  2. This was a fortunate opportunistic handheld shot given slow shutter speed, allowing fairly clear shot of two pedestrians, whilst blurring one walking across the shot and the train. A tripod was inappropriate.
  3. Again a tripod was not appropriate here, but stability for the camera and slow shutter speed was found on the wall by the pavement, allowing the fairly normal street scene whilst the blurred moving train crosses.
  4. Here I wanted a slowish shutter speed to allow the slight blurring of the train, whilst being fast enough to be handheld.

Special safety care clearly needed to be taken here given combination of trains, cars and pedestrians. Hence a tripod was only used on the walkway. I made every effort to keep clear of pedestrians and cars (although stationary). AC4.2

Postcode 5 (plus one)

I chose the following 5 shots for the postcode project, as they display the broad variety of the area, combining tranquillity and nature with the busy nature of this suburban area so close to a big city. They all also represent different manmade pathways through that nature.


Unit 1 – Task 2 – Shutter speed AC (2.1,2.2)

Shutter speed, or exposure time, refers to the amount of time that the sensor on your camera is exposed to the light of your image.  Shutter speed is normally measured in fractions of a second, however very long shutter speeds can stretch into seconds and minutes. Different shutter speeds can create very different images. The faster the shutter speed the more one can freeze fast action, whilst a slower shutter speed can blur movement, both creating very different effects. Below is a brief visual description of the effect of different shutter speeds.


Image result for shutter speed


Depending on the focal length being used a tripod becomes necessary at speeds around 1/60, otherwise non-deliberate blur will occur.

One can adjust shutter speed directly with shutter spreed priority on the camera, or via aperture priority and ISO adjustments. This is best described in the diagram below.


Image result for shutter speed

Source; SLR Lounge

Working with aperture priority, the wider the aperture , the more light allowed into exposure, the faster the shutter speed. Conversely, the narrower the aperture, the less light allowed in, the slower the shutter speed. This can be offset by increasing the ISO. However, as the ISO increases , the more the quality and clarity of the final shot becomes impaired. Hence it is best to try to get the shot at ISO 100, and then acknowledge that you are comprising quality thereafter. Sometime this is necessary to get a a very fast shutter speed.


The photos above are ordered by shutter speed:-

1.This required a very fast shutter speed in order to capture a bird in flight, and in focus. In spite of having the aperture set at its widest, I still needed to increase the ISO to 500 to get the shutter speed up to 1/1250 sec.

2. was a handheld ‘panning’ shot using a shutter speed of 1/50sec. By ‘panning’, or tracking the subject, the cyclist remained in focus, whilst the blurred background emphasises the sense of motion.

3. Here I aimed at blurring the motion of the cars and people in front of the entrance at Kew.  This used a 1/5 sec shutter speed and so required a tripod set on the pavement on the other side of the road, therefore requiring extra caution with both pedestrians and traffic (LO4).

4. Similar to the third in trying to capture the motion of the bus more emphatically and the more limited motion of the waiting passenger. This required a tripod again and and in spite of f/22 aperture further help was needed from a variable neutral density filter that darkened the shot a little further, and so lengthened the exposure to 1/2 sec, thus motion blurring the bus.

5. The longest of 1.6 sec, again needing the tripod and a f/22 aperture, and so creating the blurred/milky nature of the waterfall at Kew.

6. This shot required a fast shutter speed as I wanted to capture the gulls frozen in flight. In order to get this I had to have a wide aperture of f4, which thankfully did not effect the depth of field adversely as it was taken at a distance and with 70mm.

ICM (Intentional camera movement)


As indicated by the description these photos are taken with deliberate camera shake. A slow shutter speed is clearly required and minor movements of the handheld camera or zooming in of the lens achieves these sometimes interesting results.

Ernst Haas is a well known and rather more skilled proponent of this as can be seen below.

Image result for Ernst haas Source: en.wikipedia.org

Image result for Ernst haas Source: shutterbug.com

Three Shutter speed shots