Task 3 – Still Life AC(1.1, 2.1, 3.1, 3.2)
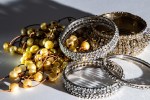
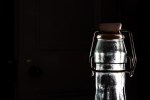
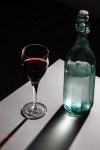
I wanted to experiment with shadow and reflection in the still life. Initially I simply used the shadow cast by a pair of spectacles with flash set up obliquely behind them and tried to create some drama with the much larger shadow. This required trying shots from all around the spectacles, and keeping the flash fairly low relative to the glasses. I also needed to reduce the power of the flash as initially it created a rather washed out effect. I then moved to jewellery, trying flash from one side and a strong torch from the other, allowing both sides of the shot to be lit whilst having shadow behind, with the right side clearly more powerfully lit by the flash than the left with the torch. I also experimented with a glass of wine and chilled bottle of water to see what sort of effects could be achieved with the dew on the bottle and the long shadows. All of these shots were taken in manual with shutter speed set at 1/125 and using a flash with various power settings. Mostly I found the flash needed to be powered down.
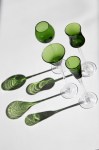
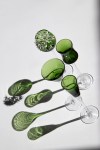
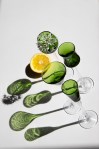
I also tried one shot of a drop of wine into the glass of wine. This required a very high ISO to achieve the necessary fast shutter speed. I finally settled on wine glasses and liquor glasses. The green coloured glasses were particularly effective at casting a long and interesting shadow. I experimented here with both flash and sunlight. The green glasses on the board created the best effect with the strong sunlight through the kitchen window. Here again I experimented with both flash and natural sunlight. The sunlight achieved the best results on this particular occasion thanks to being a particularly bright day. The white board is virtually ‘bleached’ to highlight the texture of the green glasses and the interesting shadow they cast.


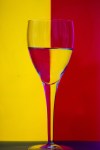


Finally I experimented with the reflection of light and colour through glasses partially filled with water, creating the mirroring effect of the colours. This was set up with coloured plastic letter files held up by bulldog clips attached to lever arch files to the side. Again I found the images with coloured backgrounds were difficult with a flash as it was difficult to achieve without some of the flash itself in the shot as the light needed to be coming through the coloured plastic folders. Once again the broader stronger but defused sunlight from outside was the most effective on this occasion. I also sometimes had to increase the ISO given the light conditions trying to use sunlight indoors. The base was also darker coloured plastic which reflected shadow upwards slightly darkening the side of the glasses given an improved effect. Overall, whilst pleased with the results I think they could be improved in a studio with a white background behind being bright lit, replicating the sunshine.

Metering (AC2.1)
Clearly getting the best exposure is heavily dependent on getting the most appropriate level of lighting.
Highlight alert – it is best to have this enabled, thereby on the ‘info’ setting you can see what parts of your photo are overexposed as that are will blink white/black in the playback mode. You need to then adjust settings to avoid this overexposure, or you may be happy with that ‘whiteout’, depending on your shot.
Spot metering – Most cameras have a metering choice – Evaluative, partial, spot and centre-weighted. Whilst the others take in the whole frame to evaluate light and therefore exposure the spot setting only uses the area within the small central circle in the viewfinder to take a meter reading of the light. This then emphasises that part of the shot and so is particularly useful for portrait photography and specific subjects such as a flower, whereby you are deliberately creating contrast. Clearly you can move the spot circle over your subject matter and note the settings to get best results.
Flash meter – Using a separate flash meter is an arguably more precise method of measuring light. The amount of light falling on the subject can me measured accurately by placing the the white dome (lumisphere) just in front of the part of the subject to be focused on with the dome facing the light source. When the flash is then triggered an accurate light reading will be taken and so the ideal aperture setting found if shutter speed and ISO have been set. If the suggested aperture is different to your ideal setting then the power of the flash needs to be either increased or reduced accordingly until you achieve your desired aperture setting.
