We set camera to manual with shutter speed at 1/125, F/8.0, ISO 100
1/125 is best speed to sync with flash. It is important to remember that the shutter speed also regulates how much ambient light enters the shot. This sets how much background you expose.
The intensity of the flash sets how bright the subject is. The shutter speed sets level of background exposure with 1/125 minimising background.


Here we experimented with flash positioning.
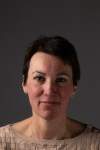
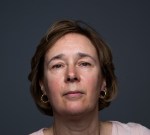
- Butterfly lighting – here the flash was set directly in line with the subject and a little above. This should light the face equally with small (butterfly) shadow below the nose and chin.
- Loop lighting – the flash is set at approximately 30 degree angle to the subject and a little above again. This lights the subject obviously slightly more on one side and generated a small ‘loop’ shadow of the nose.
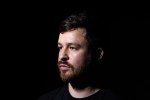
- Rembrandt lighting – the flash was moved further round at approximately 45 degrees to the subject whereby more of the right side is shaded, generating a more dramatic portrait.
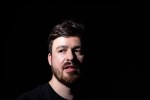
- Short lighting – the flash remained in the 45 degree angle position, but the subject moved towards it. this meant a smaller amount of the face was lit and a greater proportion in shadow.
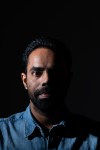
- Long lighting – here the subject faced away from the flash allowing a greater portion of the face to be lit.
- Split lighting – this is where the flash is set at 90 degrees to the subject, hence only lighting one side, leaving the other side of the face in almost complete darkness.
It is also worth noting that this shot was taken with a white background which does not show up at all due to the angle of light. We also used a snoot on the flash focusing the light purely on the subject. This also has the effect of ‘hard’ lighting.
In order to soften the light, we need to diffuse it. We can do this using a ‘soft box’. In the following photos we used a soft box which spreads the light more widely, allowing more ambient light in the shot.


In all of the photos above we had a white background. We also used reflectors selectively to balance light and shade more subtely.
- The flash was positioned for split light and with a Snoot. Hence focused, hard light with the background black.
- Same as above, but with a gold reflector held on the right hand side of the face. I think here the reflector was a little too far away, but one can see some of the right hand side of the face slightly lit, as opposed to the heavy contrast of only split lighting.
- Now the Snoot was exchanged for a Softbox still positioned for Split lighting. One can immediately see the more diffused light is now partially reaching the white background giving a grey colour. Also the lighting of the face is softer.
- We now added a silver reflector to the above setup, and the contrasts are much less severe, lighting both sides of the face , whilst painting the Split lighting effect.
- Here we returned to Butterfly positioning of the flash with a Softbox. The head was dipped a little, hence shadows below the nose and chin and accentuation of lines.
- With the head raised the lines disappear/reduce significantly.
4.1 Safety
It is important to note that Studio photography has even greater safety risks. There is scaffolding suspended from the ceiling, with multiple pantographs attached and multiple flashes attached to them. A Pantograph allows you to lift or lower the flashes which are larger and heavier than handheld flashes. One should always remember that these flashes get very hot very quickly. They should be handled with gloves. Flashes should always be raised above head height, when not in use. It should also be noted that people are in a confined space in a studio and so extra care taken. Finally, and not least , always remember the model and their eyes. Flashes are obviously very bright, and even the modelling light will make them very warm, uncomfortably so after a while.
