Task 1 – AC4.1
Clearly when setting up for a shot using studio lighting there is significant preparation, and one should always maintain good and thorough safe practise. The relevant space needs to be cleared, stool put in place and the flashes lowered into position. Once a flash is on, it is important to remember how hot they can become and how bulky and hard-edged they are. It is also important to keep the subject safe from both the bright flash and the heavy and sometimes hot equipment around them, as well as yourself.
- make a plan before shoot starts
- make sure all equipment is correctly plugged in
- keep cables to a minimum and tape them down to avoid tripping
- do not touch lamps/flashes once on – heat resistant gloves best solution
- keep area in use as people free as possible – photographer and subject only if poss
- always be aware of lowered flashes and raise them above head whenever possible
Task 3 – (AC 1.1, 2.1, 3.1, 3.2)
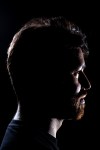
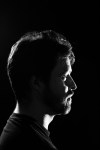
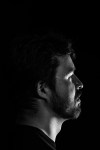
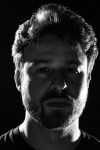
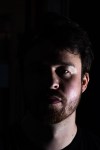
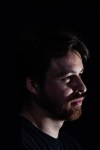
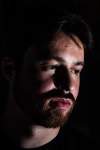
We had a dedicated studio session for this project. I wanted to use a lot of shadow and aimed for the more ‘dramatic’ shot with a dark background and hard lighting. I tried a number of angles and views, but found the side on shots most effective. Initially I set up two flashes with snoots angled from behind the subject, in order to create principally a silhouette style shot whilst also hopefully keeping the subject recognisable as well as getting catch lights in the eyes or eye where possible. This was effectively ‘clam’ lighting’ set up behind the subject. In the third shot the left hand back light was turned off and I experimented with a silver reflector and then a fill light set at a weaker strength as I wanted the main source of light to be mainly on the unseen side of the face. This was the most effective I felt as the main light is clearly on the other side of the face, but the weaker fill light allowed us to see the definition of viewed side of the face. I also experimented with the subject looking at the camera and obliquely away. The camera was set on manual using 1/125, f8.0 and ISO 100. I started with the flash power on 1, then 2 and finally 3, and assessed the results. Given most light was coming from behind the subject, the more powerful setting achieved the best results. In post shot editing I also experimented with black and white for further effect.